1.4.1 Introduction
What the main problem you have faced while plotting a line? or intersecting a line? Your lines might not be straight and might not be netting at a center part. Else it is hard to find the center of the line while plotting another one. Don't Worry Object Snaps and other functions Enables us to easily do the same work in AutoCAD. All we have to do is arrange them perfectly. Let's arrange your object snaps in the perfect way.
Status Bar Functions
Status bar has various icons and it's icon have their own function. The following table will help you to easily understand them.
| Icon |
Name |
ShortCut |
Function |
|
Grid |
F7 |
Display the Graph format on the background of the workspace. |
|
Ortho |
F8 |
Helps to draw the line parallel to the axis. |
|
Polar Tracking |
F10 |
Measures the angular measurement of the segments. |
|
Object Snap |
F3 |
Show the corners, midpoint of the 2d objects. |
as you have understood the working of the each function in the Status bar. The next main thing you need to customize is the Snaps. The above shortcut given above only turn on and of the snaps of the object don't allow to customize them.
1.4.2 Customizing Object Snap
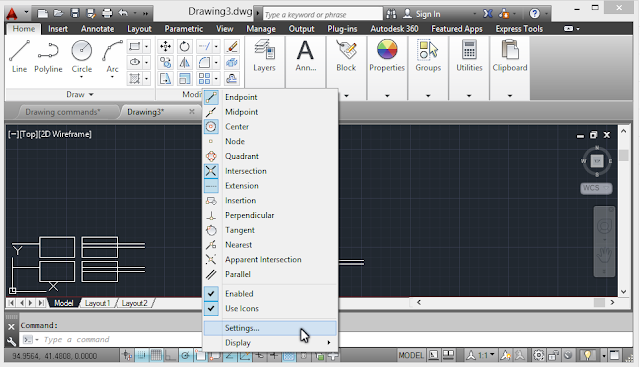
Customizing the object snap is one of the necessary thing after installing the AutoCAD. It helps us to link the Corners, Mid-Points of the objects while creating the line segments. So, it is must for everyone to customize it as per the need. To customize the object snap right click on the snap icon in the status bar. and select the option settings.
 |
| Figure 1.4.1 : Opening Settings of Snap |
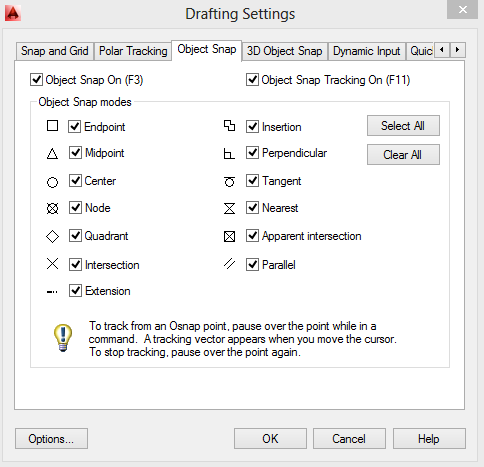
After going to settings a new dialouge box will appear with lot's of tickmark boxes. in which tick all the boxes for better workflow.
 |
| Figure 1.4.2 : Object Snap Settings |

Abhishek Bagul
Author & Editor
I am a Civil Engineer who also wish to change the world! I am the founder of ThemeDaddy and ESTIMATOR Softwares.


